healing haven

April 30, 2016

Zentangles Mardi Gras shoes

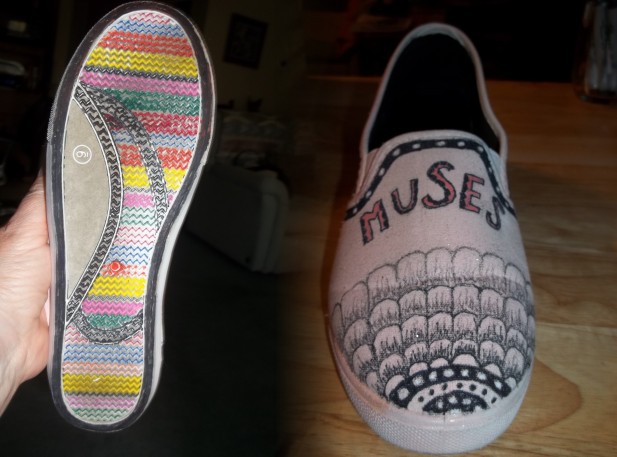
Recently I had the opportunity to tangle some shoes for a friend who is part of the ‘Muses’ Mardi Gras crew.  They hand out (not throw) decorated shoes rather than beads.  I finished doing 6 shoes for her.

2016-2-2 Margi Gras shoes 4x6

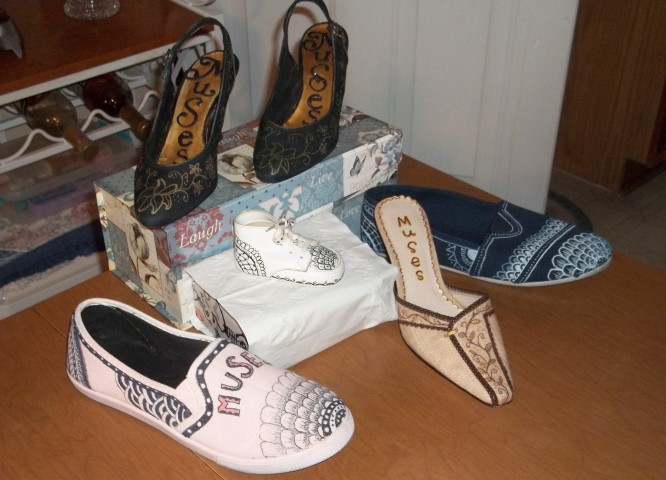
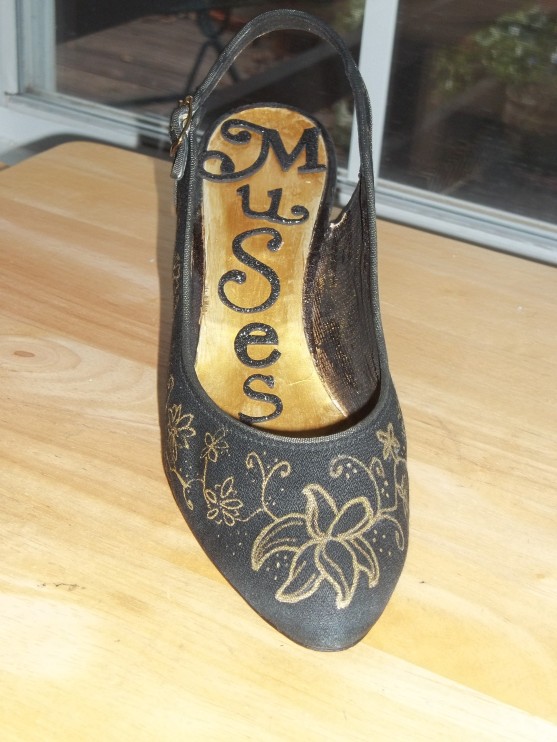
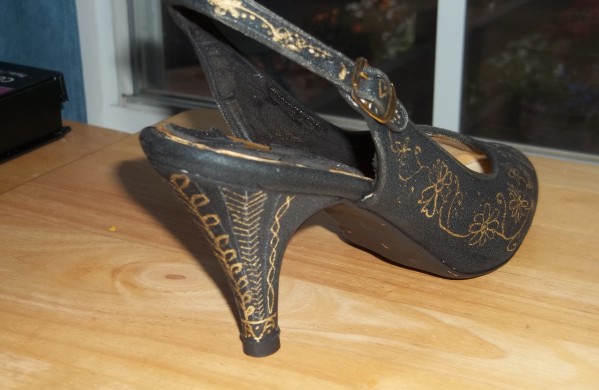
The first shoe I did was a black heel using a gold metallic paint pen for the tangle design I planned following the contours of the shoe.  I also tangled on the heel itself.  Then I used gold paint on the inside and black with gold specks alphabet letters to adhere the word “Muses”.

11-2 shoe black heel front

11-2 shoe black heel heel

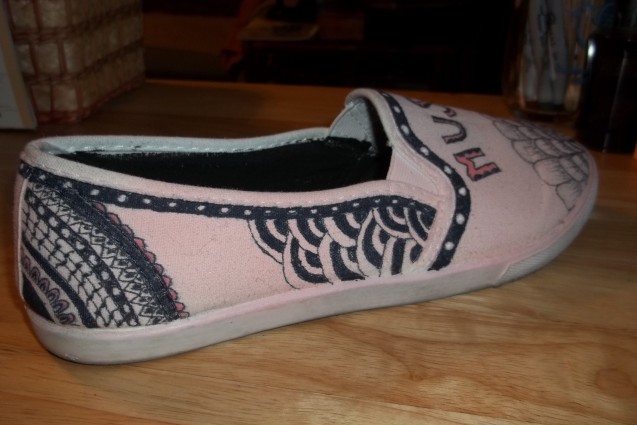
Then I did a light pink canvas shoe whereupon I followed the stitching to plot out my design.  A black Sharpie marker worked well on the outside.  I also painted the inside with black paint and used various colored Sharpies for decorating the patterned bottom of the shoe.  I later added black paint to the area of the bottom which is still gray in picture.  Again the word “Muses” is on the shoe.

10-25 pink shoe side

10-25-pink shoe Stitched

I followed much the same process for the tan heel and the blue canvas shoe.

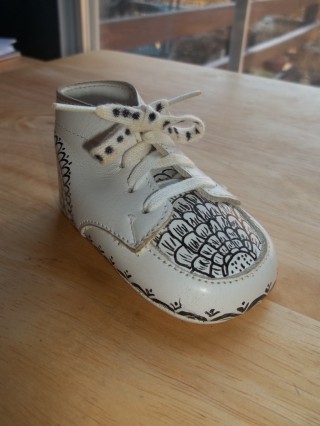
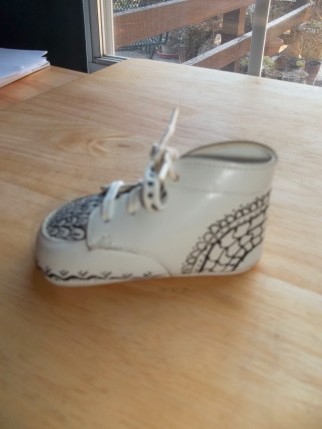
Finally, I was fortunate to tangle one of my partner’s baby shoes which she had just found.  A black Sharpie worked beautifully on both the shoe and the shoelace after being washed.

12-27 baby shoe tangled front   12-27 baby shoe tangled side inner

Making these shoes for the Mardi Gras Parade was a new and intriguing project for me.  I enjoyed the creativity and imagination needed to decide the pattern for each shoe so it flowed in a natural way with the actual physical design of the shoe.

I have used these pictures in both my Project Life album and for The Documented Life Project.  In addition, they are now a part of my partner’s memoirs.


March 21, 2016

Coral Under the Sea

This is the finished piece I did inspired from a class taken online with Paivi Eerola called Inspirational Drawings.

2015-7-31 finished Coral under the Ocean

Her method is so organic in that it starts with scribbling in pen all over creating the basic lines and shapes to work with – no planning ahead.

2015-7-17 Coral under the Ocean 1 beginnings

Then one uses colored pencils all over, varying as one goes with no outcome in mind, adding black highlights here and there and starting to see what may be happening.

2015-7-15-22 Coral under the Ocean 2 middle

Adding in a bit more of doodling and zentangle designs here and there helps to move it forward.  I also collaged on a few pieces of works I had previously done for another project which seemed to fit the design style and which brought me to the finished product seen at the beginning.  Pebbles more defined and in darker colors at bottom give a base for the piece of “Coral Under the Sea” even though I could also see many other ways I could have interpreted it (like using the face that appeared).

This is not at all my usual style but I love the freedom and the flow in the process itself.  Paivi is a wonderful teacher filled with information as well as inspiration  and combining looking at art from both sides of the brain – analytic along with creative.


August 22, 2014

Document Life Project: Week 34

This week the prompt for The Document Life Project Art Journal was to add numbers relating to your week.  After thinking about the numbers in my week, I realized that the dates themselves relate best to my week, so I decided to use my Becky Higgins ‘Rain’ Project Life cards, either whole or cut down or embellished, with the dates on each card taped so it hinges. Underneath and/or on each card will be the actual happenings and journaling of the day.   This is the tip-in page, with the background made from using a gelli plate, for the week so it has the dates of the last part of the week along with the washi tape which will attach the page to the rest of the moleskine journal:

DLP numbers 1 page
The following is the tip-in flipped over along with the first page of the planner so the numbers reflect the beginning and last of the week, all with hand-cut date numbers from the cut-down cards themselves:

8-19 DLP numbers 2 pages
And this is the completed 3 page inside spread ready for lots of journaling and recording memories of the week.  The right hand page is also made from using a gelli plate.

8-19 DLP numbers 3 pagess

What a great way to utilize some of my beautiful Project Life cards in yet another project!


August 19, 2014

Embellishing Project Life cards with Washi Tape

Filed under: Art Projects,Project Life — by thalia @ 11:57 am
Tags: , , ,

Embellishing the various Becky Higgins Project Life cards has really added to my variety of cards to use for Project Life as well as enjoying the creating itself.  So much extra can be done with washi tape.  These are examples of three 3×4 cards stitched together.

3 PL cards 3x4 Stitched-07

Here are three more embellished 3×4 cards, the one on the left with just snippets cut off from other projects:

3 PL cards-Stitched-03
And two 4×6 cards, again stitched together:

2 PL cards 4x6-Stitched-04

With some washi tape and many of your cards, bought or homemade, you can embellish and re-create new cards to use in your Project Life albums.

August 12, 2014

Gelli Plate – inexpensive and homemade

I’ve looked into purchasing a gelli plate because I loved the look of what could be done with them, but I found they were too expensive.  So I wandered through Hobby Lobby just looking, not for a gelli plate, but for something that could function as a gelli plate with the same properties.  I came across craft foam in sheets with adhesive backings in the children’s section.

8-8 DLP gelli plate craft foam
Adhering two of the 6 x 9 sheets together added some thickness and give to a solid surface.  I’ve used mine over and over, washing it out in between, and keep getting great results.  It may soak up a little more acrylic paint than the regular and you can see that some of the paint remains on the sheets even after washing, but it still works great.  The price difference is worth it.

Here are some of the many backgrounds I’ve made with my inexpensive homemade gelli plate, the left side one used for a post honoring my mother, the right used as a base for a Document Life Project prompt, with the middle one still to be used

gelli backgrounds-Stitched-02

Here, the left shows 3 gelli plate with stenciling pages ready for journaling/planner for a Document Life Project set of pages and the right ready for use.

gelli papers-Stitched-03

(And I still have four more sheets in the package.  I have used these for art journaling Document Life Projects,  Project Life backgrounds for photos, and background for SoulCollage works, even for making greeting cards.)


August 7, 2014

Art Journaling Journey

For years I have been intrigued by the pictures of various art journals, both the images and the ideas expressed.  Usually the ideas are a phrase or a quote.  But I  also like to process and journal my feelings and patterns I discover within and without myself.  But for some reason I never attempted to actually art journal, keeping my journaling and memoir writing separate from any artsy stuff I would do.  I realize I never thought I could really do the “artsy stuff” myself.

A perfectionist artist father both gave me some tools for art and discouraged me from doing art, or even thinking of myself as an art person.  Soul Food Café facilitated by Heather Blakey, was the first internet site that really drew me in with its writing prompts and information on how to set up a blog. The group was inspiring and encouraging to someone just starting out.   I loved writing as I wove in memoir and experiences with the fantasy stories.

These became part of my blogging (see blogs starting at the beginning in 2008) and proceeding onwards for those writing regarding trips to Lemuria and Riversleigh.  Shortly afterwards I came across SoulCollage (formulated by Seena Frost) and Kaleidosoul (facilitated by Anne Marie Bennett) which really resonated with me by having both aspects of the collage making and journaling to specific questions from the collage picture made.  The questions used (see my SoulCollage-Kaleidosoul page for the list of questions) are as if the collage picture itself is speaking, allowing the unconscious to come forth at times.  I also used the collages I made as part of my posting in the Soul Food Café and Riversleigh posts.

thalia-collage-cropped

SoulCollage and Kaleidosoul questions and answers combined into Project Life cards for my album in addition to photos of my everyday life and special occasions.  Project Life has provided a rich tapestry of daily life in photos and words.  Some pages had more journaling than others, but generally was limited by the size of the inserted cards, even when using the back of the cards.

Wounded child card

Document Life Project took  everything one step further and really got me I into art journaling.  The prompts were inspiring for a page or two of doing art, as the Art to the 5th Academy website and Document Life Project facebook page had wonderful videos and instructions for learning how to use the wonderful tools of art available.  The moleskin journal recommended also included a page for planning (left side) and a full page for journaling (middle page) as well as the added yip-in art page (right side of gesso, acrylics and stencils).  This all truly combined my love of journaling with playing with art – a true combination of visuals and words.

DLP wish list 3 pages
(Pinterest has been an ongoing arena for inspiration for all of these, and other, projects.)

August 4, 2014

Tribute to My Mother

For one of my art projects, I started with a red and white background made from using a gelli plate. There was a slightly elongated light white area which, somehow, reminded me of a picture of my mother taken shortly after I was born. I added the cut out picture of her standing next to the radio, a piece of furniture everyone had in their homes at the time (pre TV) and then added some stenciled flowers in white gesso. I later added this SoulCollage piece to my moleskin art journal for Document Life Project.   I also used this as a large  insert covering a few pockets for Project Life.  Of course, journaling about my memories of her and what I learned from her and have carried within to this day are part of both the Document Life Art Journal and Project Life album.

Mom w-flowers stencils

August 1, 2014

Homemade Greeting Cards

I have really enjoyed making greeting cards for all occasions for loved ones.  As I cut and paste, color and paint, create and plan, I further think of the person and my gratitude for he/she being in my life.

cards - inside

Embellishments are added, along with washi tape, which give dimension and interest to the card.  Some cards are made for my grandchildren and use their interests as a base.  In this card the picture part of a postcard from the US post office provided a perfect image complete with drawn in buildings and vehicle washi tape as the traffic below for a young grandson.

cards - 2014-6-6 Isai birthday inside

This was for a young granddaughter complete with bareback rider with recipient’s face pasted on, along with circus images and circus washi.

cards - 2014-6-6 Adira birthday inside

From the remarks received, the recipients appreciate the extra thought that goes into making  a card especially for them.  I also use my scans of the completed cards to put into Project Life albums to further commemorate their birthdays, anniversaries, new births, congratulations, etc.

July 31, 2014

DLP Prompt: use a stamp in a new way

The prompt for Document Life Project one week was to use a stamp in a different way so I debossed.  This entails applying a thick coating of gesso onto a square piece of index card, then putting your stamp into the gesso.  Some of the gesso pulls off leaving an imprint that is raised and interesting.  I then used gold and pink acrylics brushed lightly on top.  I adhered the index card to a prepared page and added a small tag I had previously done but just added the leftovers of the debossing stamp for more texture.  Washi tape connects the page to the moleskin journal.

DLP stamp debossing

The next picture shows the other side of the tip-in with a red stamp randomly applied over the page to create more design.  Then a pre-designed tag was stamped twice to create depth and washi tape lace added both more depth and texture.

DLP stamp over page w-tag

The debossed tip-in with the prepped planner page and “To Do List” complete with a parchment flower and a picture from an old movie magazine allowing room for journaling about the week.

DLP stamp 3 pages w-parchment flower

A lovely week to insert and add to my Project Life album, which will remind me of the process long from now.  And will show what I am doing during my day along with other daily photos.

May 6, 2014

The Documented Life Project

Less than a month ago I came across “The Documented Life Project”  which combines, if you follow their pattern, using a planner plus adding art journaling with one weekly challenge.  There are some free video tutorials as well as fee-based workshops which are excellent.  Roben-Marie Roberts Smith, Lorraine Conte Bell, Rae Missigman, Barbara Copeland Moore and Sandi Keene are the five ladies who have organized this into a year long project complete with a closed facebook page for sharing one’s finished projects.

DLP

One could use collage, painting (either water coloring or acrylic), doodling, scrapbooking, anything that you enjoy in which to organize your planner and art and journaling facets of yourself.   There are no do’s or don’ts.  This gave me the information tutorials to know what to do and the freedom to play on my own.  I also take pictures of the album/planner pages so as to incorporate it all into my Project Life album pages.   Project Life will focus on people and events with a sprinkling of thoughts whereas DLP will focus on the thoughts of the interconnected week’s events and people therein related to the prompt.

Since I started so late in the year, I worked on Week 17 Challenge: utilize a food box into your journal.  I looked around and saw this cereal box from the health food store and saw how it related to what I had just started: clearing out my old Hospice papers from when I retired 3 years ago.  It also related in other ways which became visible as the week progressed.  I foresee SoulCollage cards arising from this collage, as well as others, of this tip-in cereal box with box parts re-placed and a collaged on statement relating to Passion (for hospice), Peace (as someone is dying), Giving Back (to others), Natural (die a natural death):

DLP - Mango Peach tip in

Then I worked on my calendar side with coordinating colors for the daily dividers, etc.  I also included a To Do List and a top tip-in on my calendar page honoring my start of the DLP.

4-24 DLP food 3 pages w-white-out

Finally I played with gesso combined with pink, cream and gold acrylics to form the foundation on the back of the tip-in to provide a base for more journaling carried over from the middle page within.

4-24 DLP pink-gold page w-calendar no words

I took pictures of the various layouts and added to the Documented Life Project facebook page as well as into my Project Life album for this year.  I keep both journals/albums open and move from one to the other, getting inspiration and enjoyment from each.


Next Page »

Blog at WordPress.com.